In this article:
Optional - Download Product Numbers
Using in a Production Sequence
Overview
The Furness Leak Test step in Tascus MES supports two instrument modes:
FCO730/750 – leak-only pressure-drop tester
FCS489 – leak tester + auxiliary electrical (current) test
All F-BUS parsing and result decoding is handled behind the scenes; operators only select product names and read PASS/FAIL plus numeric values.
Prerequisites
A PC station with a free COM port (RS-232/USB↔RS-232 adaptor or RS-485 as needed)
Furness tester powered, cabled (Tx, Rx, GND) to that COM port
Tascus MES installed with the Furness Leak Test plugin
Station Setup
Physically connect your Furness tester to the PC:
Null-modem cable (9-pin D-plug) for RS-232
OR RS-232→RS-485 adaptor if using RS-485 multi-drop
Confirm the COM port in Windows Device Manager (e.g.
COM3).
Configure
In Tascus, open Tools → Furness Leak Test → Config.
Select:
COM Port – pick the port you identified (e.g.
COM3)Tester Type – choose FCO730/750 or FCS489
Click Save.

(Optional) Download Product Names
In the same Config window, click Get Product Names.
Tascus will issue the F-BUS Product Data command and populate a lookup list of all 300 product slots.
These friendly names drive the step configuration in your sequences.
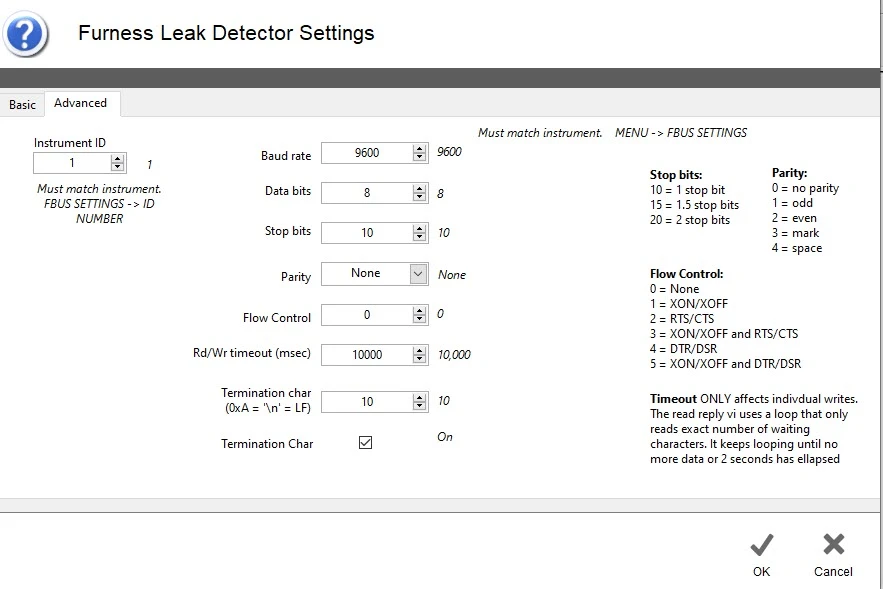
Advanced Comms Setup
If after setting the com port, the Furness Tester is still not communicating, the following setting on the Advanced page should be checked.
Diagnostics & Test Run
Open Tools → Furness Leak Test → Diagnostics.
Pick a Product Name (from your downloaded list).
Click Run Test. Tascus will:
Select Product over F-BUS
Start Test (G000)
Poll Status (M000) until “Complete”
Fetch Results (L002) and decode PASS/FAIL + numeric data
The parsed values appear in the Diagnostics window—confirm PASS/FAIL, leak value (and current readings if in FCS489 mode).
Using in a Production Sequence
In your process flow, Add Step → Furness Leak Test.
Choose one of the Furness Leak Test Programs / Product Names.
When the sequence runs, Tascus will automatically:
Send F-BUS commands to the configured COM port
Monitor until status = Complete
Download & parse all result tags
Expose outputs to MES (PASS/FAIL booleans, numeric leak/current values)
Operators never see raw F-BUS hex or CSV—the plugin handles every low-level detail for you.
Troubleshooting Tips
No response / timeout → verify COM port settings (baud, parity, flow) match the tester’s F-BUS config.
Empty product list → ensure your tester is in “run” or standby mode so it responds to product-data reads.
Test hangs → open Diagnostics log to see if Tascus polled
M000too rapidly; try increasing poll interval.Incorrect type → confirm you selected the correct Tester Type (FCS489 vs. FCO730/750).